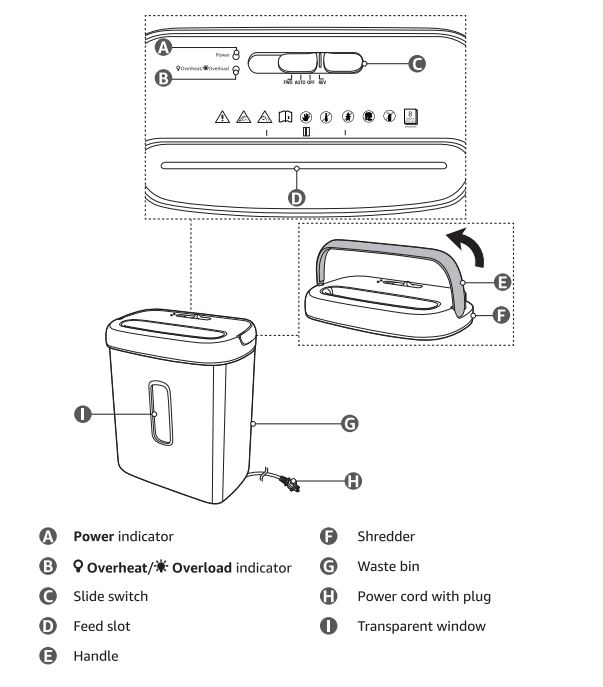
The Amazon Basics 8-sheet cross-cut shredder is a reliable device for securely managing sensitive information. However, users sometimes face challenges with the bin removal or replacement process. These issues can interrupt workflow and cause frustration.
The shredder’s bin is an integral part of its functionality. It:
- Collects shredded materials like paper and credit cards.
- Prevents mess and ensures secure waste disposal.
- Engages with sensors to confirm proper installation for safe operation.
When the bin is not removed or replaced properly, the shredder may refuse to operate or show error indicators. This guide provides a step-by-step solution to troubleshoot and prevent bin-related problems.
Identifying Common Bin Issues
Here are some of the most frequently reported problems related to the shredder bin:
- The Bin Feels Jammed or Stuck: Difficulty in removing the bin due to compaction of shredded material or mechanical obstructions.
- The Shredder Fails to Recognize the Bin: After replacing the bin, the shredder might show error lights or fail to start.
- Sensors Are Misaligned or Blocked: Sensors that detect the bin’s presence may be misaligned, dirty, or malfunctioning.
- Improper Fitting: The bin is not securely reinstalled, leading to operational issues.
Amazon Basics 8-Sheet Cross-Cut Shredder: Step-by-Step Troubleshooting Guide
Step 1: Power Down for Safety
Before handling the shredder:
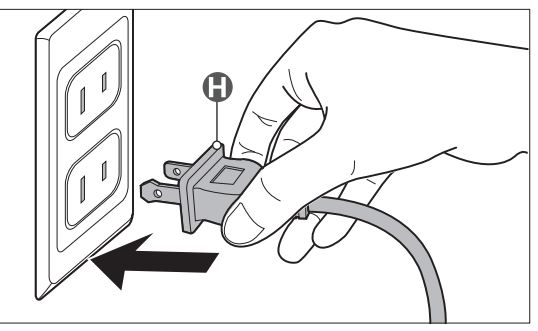
- Turn Off the Device: Switch off the shredder and unplug it to prevent accidental activation.
- Create a Clear Workspace: Ensure you have ample space to handle the shredder and bin safely.
Step 2: Removing a Stuck Bin
If the bin is jammed and won’t budge:
- Shake Gently: Hold the shredder body securely and gently shake the bin to loosen compacted material.
- Inspect for Obstructions:
- Check for shredded material wedged between the bin and shredder body.
- Use tweezers or a similar tool to carefully remove obstructions.
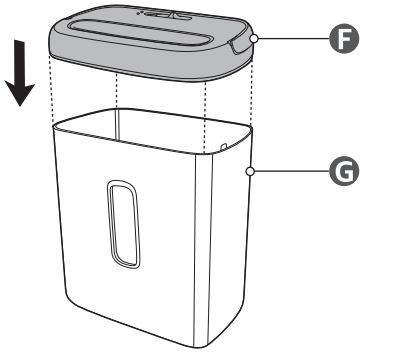
- Apply Steady Pressure: Grasp both sides of the bin evenly and pull it out with consistent pressure to prevent warping or further misalignment.
Step 3: Replacing the Bin Correctly
To avoid misalignment issues during replacement:
- Align the Bin Properly:
- Ensure the edges of the bin match the grooves on the shredder body.
- Misalignment can block sensors and prevent the shredder from functioning.
- Push Firmly: Insert the bin gently but firmly until you hear a click or feel it lock into place.
- Test for Security: Tug lightly on the bin to confirm it’s securely installed without being loose.
Step 4: Testing the Shredder
Once the bin is properly replaced:
- Power On the Device: Plug the shredder back in and switch it on.
- Check Status Indicators: Ensure the LED lights show no errors. If lights persist, recheck the bin alignment and clear any blockages.
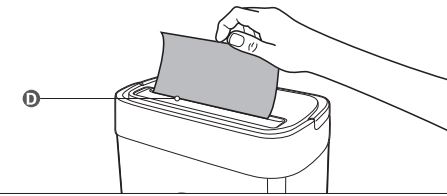
- Perform a Test Shred: Shred a small piece of paper to confirm the shredder is functioning properly.
Additional Troubleshooting for Persistent Issues
Blocked or Dirty Sensors
Sensors located near the bin’s installation area can become dirty or blocked over time.
- Cleaning the Sensors:
- Use a soft, dry cloth or compressed air to clean the sensor area.
- Avoid using liquid cleaners that might damage the internal components.
Dealing with Overfilled Bins

Overfilling the bin can compact shredded material, causing the shredder to jam or malfunction.
- Prevent Overfilling:
- Regularly empty the bin before it reaches full capacity.
- If compacted material is stuck, use a blunt tool to dislodge it gently.
Resetting the Shredder
Resetting the shredder can resolve some bin detection errors:
- Turn off and unplug the shredder.
- Wait for a few minutes, then plug it back in.
- Test the shredder after replacing the bin.
For persistent problems, don’t hesitate to reach out to Amazon customer support or a professional technician.
Preventive Maintenance for Smooth Operation
Taking preventive measures can minimize the risk of bin-related problems:
- Empty the Bin Frequently: Regularly empty the bin to prevent overfilling and compaction.
- Clean the Shredder Regularly: Wipe down the exterior and remove dust from the sensor areas.
- Inspect the Bin for Damage: Check for cracks, warping, or wear that could affect alignment.
- Avoid Forcing the Bin: Always handle the bin with care to avoid damaging the grooves or mounting area.
When to Contact Customer Support
If troubleshooting does not resolve the issue, seek professional assistance:
- Check the Warranty: If your shredder is under warranty, contact Amazon Basics for repair or replacement options.
- Customer Service: Visit Amazon’s help page or call their support team for guidance.
- Professional Repair: If the shredder is out of warranty, consult a qualified technician for repairs.
FAQs About Bin Removal and Replacement
Why is the bin difficult to remove?
This could be due to compacted shredded material, misalignment, or mechanical obstructions. Follow the steps above to gently remove it.
How do I know if the bin is properly replaced?
When correctly aligned, the bin will fit snugly, and the shredder will operate without displaying error indicators.
Can I operate the shredder without the bin?
No, the shredder is designed not to operate without the bin installed for safety reasons.
How often should I empty the bin?
Empty the bin whenever it is about three-quarters full or after each shredding session for best results.
Issues with bin removal or replacement in the Amazon Basics 8-sheet cross-cut paper shredder can be frustrating, but they are often simple to resolve with the right steps. By following the troubleshooting tips and preventive maintenance outlined in this guide, you can ensure your shredder operates smoothly and efficiently.